Forms are quickly created in Access using a selection of automatic
and manual processes and provide 'attractive' on-screen data displays
if well thought out. It is not usual that forms provide the hardcopy
from databases (due primarily to their graphical appearance, and the
relatively poor appearance of graphics views when printed on anything
other than a color printer)
Choose NEW from the Form section of the Database Window, then the
Blank Form button to get to the Form builder window.
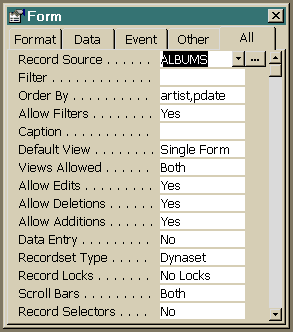
Press the PROPERTIES button to bring up a list of general form properties.
Enter Record Source as Albums, and change the Default View to Single
Form. Once this is done, hide the form properties by pressing the
PROPERTIES button to turn it off (it is a toggle).
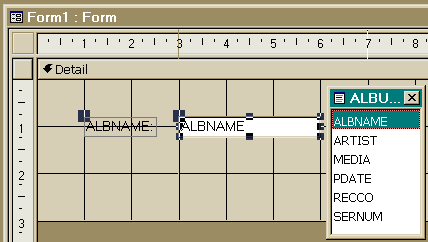
Press the FIELD LIST button on the button bar to display table data
fields available for this form (Albums was nominated previously so
6 fields are presented). Point to and click-drag AlbName onto the
form. Notice that there are 2 sets of 'handles' - one for the Field
Label and the other for the Field Data. The Top left handle on both
is the move handle, each of the others allows you to re-scale (grow/shrink)
the item.
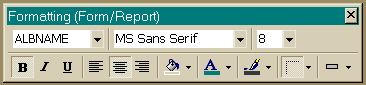
Select the FONT and POINT SIZE that you find pleasing from the relevant
controls on the button bar.
Press the PALETTE button on the button bar, then customise BackColor,
ForeColor and BorderColor to your taste (keeping in mind that the
purpose of data display is allowing the user to easily SEE it).
Point and click on the form background and change it's colour to
suit the text. Notice that some colour combinations look better than
others. The PALETTE also provides ready access to Special Effects
such as border styles and 3-D appearances (raised and sunken). Prudent
use of these options can enhance the on-screen appearance of your
data
Arrange the remaining fields, dragging them around until you are
happy with the layout. To apply gross changes to a number of elements
all at once, drag a selection area around the required items to select
them all.
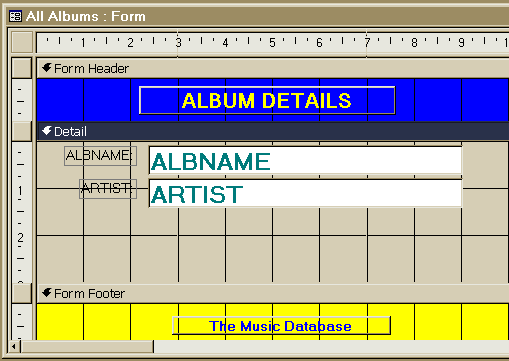
SAVE this form with the name All Albums.
Try the form out on your data by switching to FORM VIEW (press the
FORM VIEW button on the button bar), flip back to DESIGN VIEW mode
and adjust as required.
Notice that in FORM VIEW, you are presented with page after page
of albums details (single album per page) - record navigation buttons
(first, previous, next, last) are presented for you at the bottom
of the form window (courtesy of the default settings), and the PAGEUP/DOWN
keys let you flip up and down through the stack of albums also.
Notice also that the stack of albums is un-sorted (as is the base
Albums table). It is possible to impose order to the table, another
option would be to use a sorted query as the record source.
This FORM VIEW of the data (by default) is an updatable view - presented
is a dynaset which communicates changes directly to the base tables,
and can provide the user with a friendlier front-end to that single
table.
SOME SIMPLE FORM CONTROLS
A Control is defined by Access as an element of a form. Some controls
display data, others allow navigation, edit data or provide triggers
to other actions.
In DESIGN VIEW of the All Albums form created previously, press the
TOOLS button on the button bar to bring up the controls available
for forms.
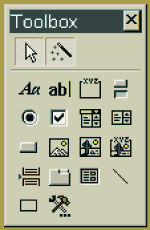
To create a RECORD NAVIGATION BUTTON:
- Ensure that the COMMAND WIZARD button is down on the TOOLS menu.
- Press the COMMAND BUTTON button on the TOOLS menu, then move
the crosshair cursor onto your form and click-drag an approximate
shape for your button. When you release the mouse button, a button
shape will appear and the BUTTON WIZARD will appear.
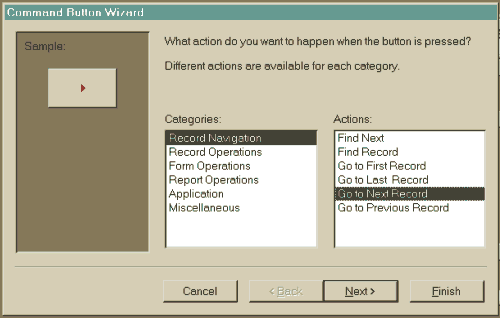
- Select Go to Next Record. You will notice that the complexity
of the button's action is determined by what it is designed to do.
Select Next>
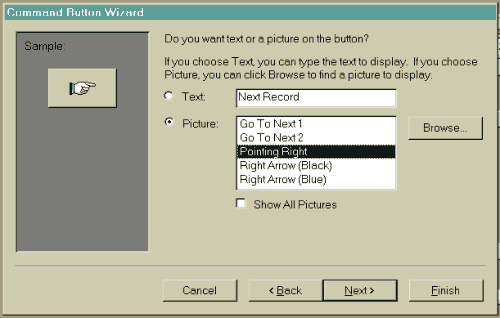
to further specify, then from the next window, select Picture then
a picture from the list of bitmaps presented. When you are satisfied
with your selection, press Finish to place the button on your form.
- Use the handles on the button to scale and position your button
to suit.
- Save your form.
- Try out your button by changing to FORM VIEW.
- Return to DESIGN VIEW to further customise your button using the
TOOLS and PALETTE menus, and by specifying PROPERTIES of it directly.
To create a COMBO BOX:
- Enter DESIGN MODE on the All Albums form and delete the Media
field and it's Label - this is to be replaced with a smart drop
list Access calls a combo box.
- Press the COMBO BOX button on the TOOLS menu, then move the cross-hair
cursor to the position the deleted media field occupied and click-drag
a rectangle about the correct size of the missing field. When you
let the mouse button go, the Combo Box wizard will appear.
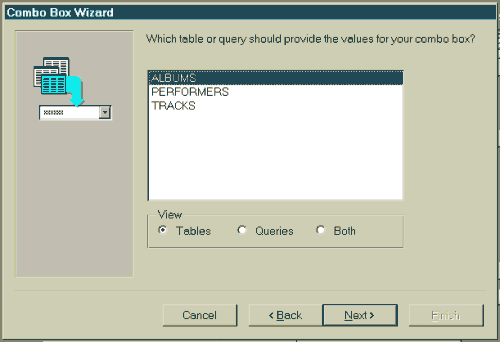
- Nominate that you want the Combo Box to Look up Values in a Table
or Query then press Next>.
- Indicate the information source is the Albums Table, then press
Next.
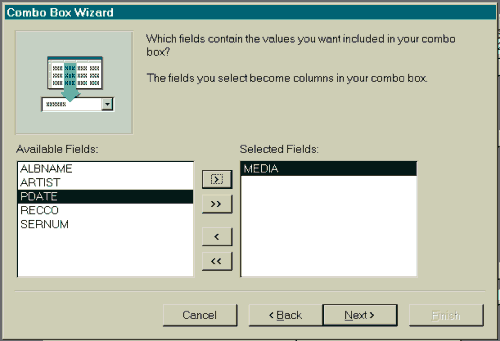
- Add Media to the list (of one) columns to appear in the combo
box, then press Next.
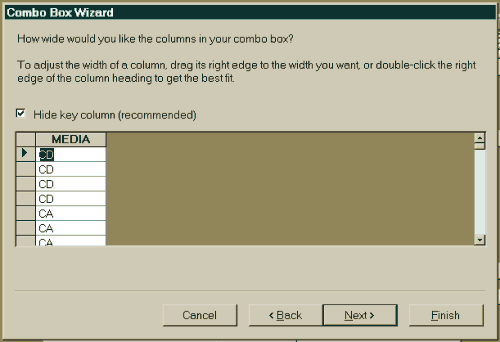
- Size the answer table width by dragging the right column edge
smaller, then press Next.
- Check Store that value in this field and nominate Media as the
column name, then press Finish.
- Position, colour and scale the new combo box on your form. Change
it's (rather cryptic) label to Media by clicking in the label twice
slowly, then typing the new name.
- Try out the new control in FORM VIEW. You should notice that the
media field now displays the current media for that recording, and
allows you to drop a list of all other media to allow you to change
Media to any value on that list, or to type an entirely new media
in the space instead.