436: Sydney Opera House

Anyone who knows me understands my fascination with the Sydney Opera House, as a kid I saw the sails of it being built:

Set magnificently on Bennelong Point right in the heart of the harbour, it together with the Sydney Harbour Bridge (no, do not panic, I am not making that) are quintessential Australian icons.

Googling one day I stumbled across a design idea from Gerwin Sturm (2007) for a box pleated version of my fav building on earth, and some vague explanations of how it “should be possible to collapse and shape based on a 32×32 grid”. Continue reading

418: Kamiya’s Golden Retriever

As soon as I knew Satoshi was due to release a new book, I knew I had to have it:

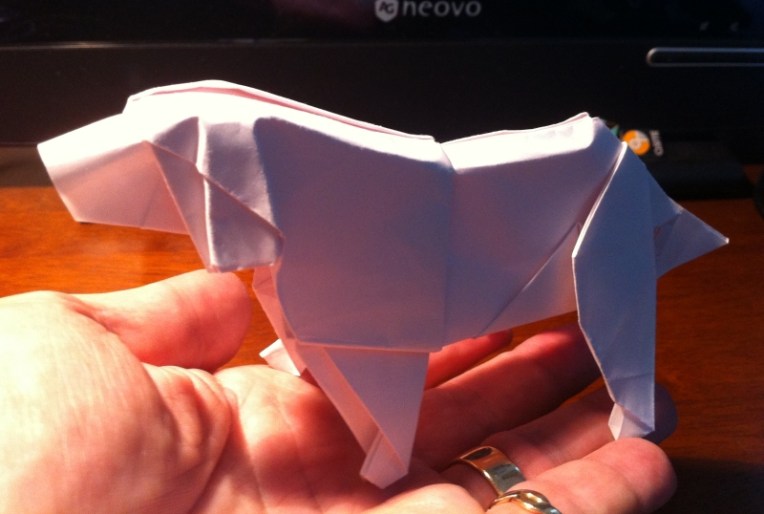
This is the first fold of my first model from “The Works of Satoshi Kamiya 2”, and it is quite recognisably a Golden retriever/labrador. 

For anyone who has been blessed with a lab in their life, you realise how wonderfully gentle, soppy, stupid and plain lovely they are.

This model is dedicated to the memory of “Missy” and “Raffy” – two much missed pets (one of my in-laws, the other a mates family pet).

I love how this model is demonstrative of form without necessarily capturing every detail. The fold technique is odd, but interesting and each time I wrangle the head/shoulders, you get a slightly different aspect, expression and posture – lovely use of a sheet.

I used lithography paper for this, but have also folded it with a piece of double-sided kami, with good results.  I think I like the white fold, however sandy/buff would be more demonstrative of the actual dog’s colour.

This is the first, of a series, taken from this wonderful book – some serious challenges ahead – bring it on!

414: Sopwith Camel

I have been asked many times by well-meaning people whether I can make paper air planes:

The honest answer is “sort of” – I love fantastically complicated and detailed Origami models of actual planes, but cannot make one that can fly for shit.

This little beauty was a right bastard of a fold but closely resembles, at least in intent, the Sopwith Camel – a famous dogfighter in WWI. A fantastically detailed little model with propellor, machine gun, pilot, landing deat abd a lovely set of supported twin-wings.

Designed ingeniously by Jose Maria Chaquet from a bird-base within a bird-base, I mis-judged how dense the paper would become and started with too smaller a square I think – 40cm was not big enough, but still, battled on with the Kraft paper and think the end result is pretty nice for a first fold.

If I were to fold this again, I think 50-60cm would make the final modelling easier. As the fuselage is so dense I had to “cheat” and use some small bits of double-sided tape to hold it together and stop it unfolding itself in the humidity but I will not tell anyone if you do not.

409: Wedding Blossoms

A little over a year ago, my daughter as part of the very early planning stages for her wedding asked (in only the way a daughter can) if we could do something different with the flowers:

After much looking around, experimentation and reject schemes we came up with a 5-sheet rose (4 2×1 rectangles for the petals and 1 square for the calyx) secured by wire to make pose-able stems. We have folded for a year, making hundreds of blooms, to be deployed in each of the floral components of the ceremony and reception.

Bouquets

The original idea was to create enough flowers so the bouquet was a little wider than a hemisphere – each containing 3½-4 dozen roses based on 2 colour schemes: the bride wanted dark blue with occasional white blooms, the bridesmaids were predominantly white with occasional sky-blue blooms.

After the roses were stemmed and calyxed, the were wrangled into bunches, stems bent equidistant from the bud to later help in the whole ball effect.

We then bound the wire in white gaffer tape to form a preliminary handle and the tweaked the flowers to be evenly distributed and ball-shaped. On the evening before the wedding we added baby’s breath (gypsophylla) and a sheath of spathyphyllum and bound them with florists green tape (a goopy, stretchy stuff that sticks on contact).

The morning of the wedding I then frapped (macramé term) the handles with white ribbon, trimmed the tail and they were done

– every bit as lovely as I had imagined them, perfect foil to the lovely bridal party.

Buttonholes

Grooms-men, parents and siblings needed a buttonhole – single bloom, amidst baby’s breath, atop a sprig of asparagus fern from the garden.

The scheme was simple – powder blue for the grooms-men to match the bridesmaids bouquets, white for parents and siblings.

We wrapped them with florists tape to store-bought brooch pins, presto, done

– quite smart I think and a nice tie in to the rest of the floral theme.

Table Decorations

To tie in the floral accents, we decided to do something with flowers on the tables, containing all the colours we used (3 shades of blue and white).

Originally it was going to be just a sheath or arrangement, but the bride to be found candle holders so I found wicker rings that encircled those, then we made circular wreaths of randomly scattered blooms.

The day before the reception, we added baby’s breath and twigs off our needed to be pruned miniature camellia from the garden, creating lush and beautiful garlands which, when the candles were lit were really magical. I was a little concerned that the waterproofing spray (a plasticiser I thought might be necessary to stop moisture making the petals droop) would increase the flammability but all was safe in the end.

Guest Gifts

We wanted each guest to leave with a little of the floral loveliness, and also tie in who was at what table, where.

We hatched a plan to make a bloom for everyone, attached an embossed leaf to each (bone-folder to impress “veins”) and hand-written names for all invited guests.

Those that could not make it will receive their blooms via some other means – nice memento of what was a lovely wedding.

404: Joisel’s Bandonéon

I first noticed this lovely little fold nestled amongst the masterpiece that is Eric Joisel’s Musicians, and decided that i must try to work out how to make it:

Now the “purists” amongst you will recognise this as a “Concertina”, but that is splitting hairs, given a “Bandonéon” is square, this is clearly hexagonal, but I digress.

Presenting a tantalising hand-drawn crease pattern idea on his memorial website, I decided to try and work out a method for this fold.

Unlike the original, my design is based on a 32 x 20 grid, making an extra gather in the bellows section (which is not a bad thing) and a simpler join along the long seam (which, sadly, I still needed to use double-sided tape to close).

The geometry of this model is really nice – the bellows almost fold themselves when the creases are laid in – I experimented with the seam in and thought it looked better with the strappy seams out in the bellows.

fashioning handles at the end happens quite naturally if you have been neat, and folding it without any extra creases is possible if you concentrate, making the presentation fold very tidy indeed.

I have folded many of these, they are lovely and, now I have a handle on the scaling factors and geometry there is a knack to making them that is quite easy to pick up.

On the same hand-drawn crease pattern, there is another that supposedly makes a saxophone – might give that a whirl as I seem to be in a musical instrument frame of mind at the moment. very happy with this one however, and need to move on from it.