I bought some new shirts yesterday – interleaved inside was some lovely white tissue. I folded it into 3rds, then half to get a square, then half, then half and kept going until I had a small, multi-layered square about 8cm on the side.
Next I crumpled that so the centre of the square was a point. It was tough as there were so many layers. I then opened the last halving, reinforced the valley between, inverted one of the points (as one was up, the other down), and re-crumpled the points.
Repeating this technique, opening a layer, reinforcing the valleys in-between each point, inverting half so they all pointed the same way and re-crumpling, allowing the crumples to become more random as they thinned out.
I have always been fascinated by Egyptian symbology, myths and ancient artforms. The very pictorial style is angular, stylised, often animal-based and very interesting. Anubis is the god of funerary rites, protector of graves, and guide to the underworld, in ancient Egyptian religion, usually depicted as a canine or a man with a canine head:
I am currently watching STARGATE, a few episodes at a time with my son. I began watching it back in the days of free-to-air broadcasting but, for whatever reason I stopped (prolly because I had a life and no longer had time/access to episodes). The series premise is interesting, and I particularly love their hijacking of Egyptian gods/mythos as the “baddies”, as well as the whole aesthetic.
I wish I could remember where I first found this Crease pattern (CP). It has been in my “must try this, sometime” pile for a couple of years and I finally got around to it when looking for something to fold with my second bit of treated Wenzhou rice paper (not made of rice, is a fine and resilient mulberry). I also wish I knew the designer – can anyone help me out here as I would love to give proper attribution?
The CP seemed pretty straight forward – indeed the collapse was quite natural (I did not do my usual “parachuting” as I tried to collapse key details in the order that seemed most logical), and resulted in a base with a myriad of stickey-outey parts in more or less correct locations. I am so pleased with my developing CP solving skills – a loooooong way to go, but every success encourages me further.
30 years ago, the Papermakers & Artists of Queensland (POQ) first formed – in July it was their PEARL anniversary.
As a diverse collective of artists (that allowed me to become a member) we were asked to respond to the notion of “Pearl” to assemble an exhibit of artworks to mark this occasion.
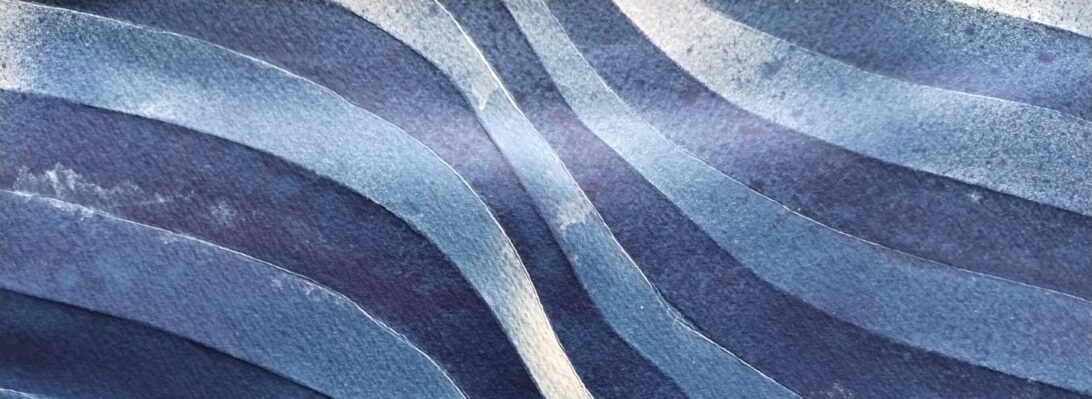
My thoughts, naturally, turned to folding and I was reminded of an organic 3D form I last explored for “The Offering” inspired by the work by legend Paul Jackson.
The idea was simple – using one set of slightly overlapping pleats in one direction, that are then corrugated in the perpendicular direction, you can “tease” dimensionality by “cheating” the overlap with a delicate pull.
Taking a square of trusty Kraft paper, I mocked up a Maquette, pleating and corrugating around a central line, then “MacGyvered” a hinge using simple box-pleating techniques, as I had the notion it should be a “book” of sorts. The hinge mechanism had a natural gutter that allowed me to bind pages securely inside also.
For the production fold, I chose metallicized pearlescent “Terryfoil”, I cut 2x 25cm squares and pleated and corrugated, carefully, then spread the pleats until it achieved the desired curvaceousness.
Comes the time of year when we tell little kids that a morbidly obese stranger in a red suit breaks into their house (by coming down a chimney or other entry point if there is no chimney), eats some random snack, feeds a portion of that snack to a reindeer (who has a birthmark on it’s nose) and then leaves presents, regardless of whether you have been an entitled little shit all year, or a saint:
As a parent I was complicit in this lie until my kids (fairly early on) cottoned on to the fact that this whole thing was so very unlikely, and merely a mechanism for justifying a mound of presents under the xmas tree.
I wanted to try out the new paper pack of Satogami I got from Origami-shop and this festive fold seemed like the perfect opportunity given the latest Tanteidan magazine (which contains it’s diagrams) arrived this week also.
Duo Satogami is quite thick. I bought a paper pack of 58cm squares, mixed colours and love the vibrancy of the red/white, and also love the texture of the paper. I _want_ to report that pre-creasing Satogami was easy … but … I really struggled to my the reference folds and to fold accurately because of the thickness and texture. The paper reverses fairly poorly also (meaning I had to correct lots of folds for accuracy as I went to ensure alignment of layers and edges during more complex moves.
Occasionally I am privileged to be asked to test-fold new models, and I jumped at the chance to fold this Numbat:
As far as I can see, this is the first depiction of this native Australian insectivorous marsupial in origami and the design captures the morpohology and proportions really well.
Starting with a preliminary base, then folding a skewed birdbase, the side stripes naturally emerge in cleverly controlled colour changes, along with the legs, neck and ant-eater-like snout, along with a lovely bushy tail.
I folded this chap from a 40cm square of white/natural Kraft paper (some of my last from the Ikea stash – I wish they sold it again, great stuff) and the fold sequence was fun – some really interesting moves and a good range of skills necessary to complete the model neatly.
Leafing through one of the origami books I helped edit, I came across a cutey little “Godzila”esque model I had not folded:
Designed by Oriol Esteve, from his book “Fold with the Flow”, this charming little Chibimonster seems ready to terrorise Tokyo and dodge nukes as the ineffectual army fights back.
I used to watch monster movies with a passion, and the old “guy in a rubber suit” versions were terrifying as a kid, but the whole Godzilla franchise seems to go on and on with re-imaginings and various levels of tech in the VFX often getting in the way of the story, at least these days.
I had a 25cm square of blue metallic paper (I think from a sample pack from Origami-shop) that was light blue on the reverse, so decided to torture it into shape. The book suggests Kami, and thinner paper would have made some of the moves less thick, but I think I like him chunky. It is a fun design, starting with one of Oriol’s much-used bases. I like that both the eyes and the back spikes are colour changed. The proportions are nice and I also like that he free-stands because the centre of gravity has been considered in his pose.
I virtually attended OWM4 (Origami World Marathon 4) recently – one of the classes I attended in the wee hours of the morning was a workshop run by Riccardo Foschi:
Riccardo has a recognisable style and his models are a delight to fold (you will find lots of them in this blog). This stylised human bust has such a serene expression on their face, I knew I wanted to try it.
My fold live in the workshop was ok, but re-visiting it when I had some more time (and better understood the fold) resulted in a nicer overall model.
I had recently purchased some “Shadow Thai” paper from Origami-shop.com and thought it would be a good fit for this model.
I chose a grey/smoke blue sheet (black on the reverse, it is a duo paper) and figured because it is a little thicker that it would help with the statuesque quality of the design.
When you talk of “box pleating”, the young kids in the origami design sphere seem to think they invented it. I was fishing around on the web, for origami-related things as you do, and stumbled across an astonishing scanned page from Neal Elias’ notebook from 1968 that features box pleating:
This is Neal’s “Boy on a motor scooter” – an amazing proto-design from 1968!!!!! (this is all there is, you have to fill in the gaps – it was his personal notebook, the diagrams were all HE needed to fold the model) but what an historical gem of a design. It is doubly interesting because it was designed 3 years before I began my journey in origami as a wide-eyed, clueless 11 year old.
Further research suggests this page was “ripped” from a BOS Publication Booklet 35 (still in print?) called “Neal Elias Miscellaneous Folds – II “, edited by Dave Venables. I have purchased the previous Neal Elias volume but was unaware this treasure exists – it has prototypes of some very famous and completely revolutionary designs indeed (like “The Last Waltz”).
Back in the “early” days of western origami, Elias was a pioneer, realising that by gridding a sheet of paper, then using gridlines and 45 degree connectors you could pleat astonishingly complex structures that could then be shaped into complex figurative models. As a kid, the few models I had access to from him were like crack to me. I mastered the “Elias stretch” (these days I think they call it a ‘pythagorean stretch’) and “Elias base”, making skiers and knights in armor, all from squares.
Many of his designs use odd shaped paper – this model uses an 8×22 grid, and the colour change base is particularly wonderful, leaving all the bits of a person in one colour and a lovely long pleat bundle of alternate colour emerging from him. I can see so much potential of all sorts of things here.
Things have been busy, lots happening in the real world so it is sometimes nice to get lost in a fold or two:
This lovely fully 3D skull, designed by Naito Yukata and wrangled from a 3:1 rectangle has been quite a journey.
The pre-creasing was fiddly but laid in landmarks that then aided the staged collapse. I found it easier to collapse parts of the model separately, then open the sheet back out to do the next section, laying in the final resting creases as I went – this meant that the “all at once collapse of the top part of the skull was easier.
The teeth introduced a lovely layered pleat structure I had not seen before and the overall shaping is a bit of an art I think.
Determined to fold something, I came across some diagrams in Origami Dan (an origami-focussed Discord) and figured I would give it a go:
The idea behind the the fold is interesting – making, from a square, a 3×4 matrix of “pixels” that can be colour changed either whole or in part. From this base you then strategically reveal colour to form letters of a typeface.
Designed by Jason Ku, it is a clever and flexible shape and I then set out to form all the letters of the alphabet and digits of basic numbers.
Some of the letters represented more challenge than others – some had little fiddly 1/4 triangle components, others had reverses contrary to the underlying structure, requiring some strategic swivels and reverses. the more observant among you will realise I stuffed up the colour conventions and got a few letters in reverse colours to the others (I, J and L for those that did not notice) – meh.
The most time-consuming part of this fold was compiling the photo record and stitching it together – happy I managed it however.
There are many models I just HAVE to have in my folio – David Brill’s “Double-Star Flexi-Cube” is one such model:
I first folded this back in my first 365 origami project (the original reason for this blog). At the end of the first 365 I held a charity auction and the original white DSFC provided a rather nice amount for my nominated charities.
I have only just got around to folding it again. This model requires A-series paper proportion, so I decided (insanely) to use A7 sheets, and chose 2 bold colours (red – yes that is RED, my phone camera seems singularly unable to photograph it, and purple) because I had 4 sheets of each. Each A4 sheet is cut into eighths – 64 sheets (32 for each cube)
deliciously, you fold 2 identical stars then, by the magic that is geometric topology and strategically placed “hinges” you can morph a star into it’s own negative (a cube with a star-shaped hole) then nest them inside each other.
I love this to bits, but must admit to having (again) to cheat on this model – the “locks” are not very positive, it tries to pull itself apart and there is little locking it together (bar some overlapping edges, simple flap tabs into pockets etc) – this is a bit of a pity. I used small strategically placed glue spots to stop it exploding every time I even looked at it suddenly.
Flexi-geometry is remarkably satisfying to play with, the geometry of this cluster is delicious.
Just before the Origami Marathon this year, Fergus Curry dropped a free access download to a new hedron that I knew I had to try. I cut the 30 papers and then ran out of time to actually fold them prior to the marathon:
Returning to this fold recently, I went into production-line mode to ensure I had fold consistency for each module given angle construction was a core requirement (ie. there is no “template”, you make the angles fresh each page, twice).
The resultant module have a pair of hinged triangles as faces, and deep pockets and twice bent tabs that, when together, make a really positive join.
Construction was at times painful – seating the modules inside their nearest neighbors requires you insert a tab around a corner that is being pulled closed as you seat it. Early on, mating modules is ok but as you lose access to the inside of the solid, it becomes more and more awkward. I resorted to a symphony of tweezers near the end to close it up.
When tidying my JOAS Tanteidan Magazines, I discovered a special edition that members used to get – one issue in particular has 2 terrifyingly complicated models I have not (to my surprise) ever tried:
This is Hideo Komatsu’s glorious “Shore Crab”, an amazing but intense design that is described in a fascinating sequence of diagrams. They are involved, number 194, and involved many advanced techniques, and in retrospect I probably looked at it at the time I got it and mentally added it to my “try later” pile.
I started with a 50cm square of crispy Kraft, and adopted my usual fold it until it either fails or finishes.
To my delight, the logical sequence and time to be accurate and careful resulted in a clean fold which I absolutely love. The resultant crab is plucky, has bulk (indeed, most of the paper is folded inside) and is just so anatomically crabby.
It takes great skill to design a model that closely resembles the silhouette of a figurative subject. It takes a special sort of genius in design to ensure that the model looks like the subject all the way around – the underside has all the features of a crab also – just brilliant.
I made a little clear acrylic stand that snugly slots into the crab’s carapace, enabling it to stand up like it is either walking or challenging and, I added some tiny spots of glue to keep seams from gaping all that was necessary to present the fold.
One of many things I like about being a subscriber of JOAS’ Tanteidan Magazine, is the little modulars that usually start each edition. Leafing through #191, I spotted a series of cubes designed by Jun Maekawa:
My pick of the cubes is his “Binding Cube”, a delicious little 6-piece modular whose layers lock so completely and tidily, the cube looks like it is one piece.
Folded from 3 squares of Tuttle duo each split into 2:1 rectangles. The module is relatively simply folded from thirds, the lock has layers of adjacent modules interleaving in such a clever way. Some of the modules were hard to place because the lock has very little clearance if folded accurately.
I like this model a lot, and am also happy with the colour choice.
Cleaning my desk is an important psychological activity, it helps me “move on” and, oddly, I had not cleaned my home desk since well before I retired … I am not sure why, but I just was not ready:
The cleaning process also de-clutters, re-homes and generates a pile of detritus headed for the rubbish bin. Among the accumulated layers of life I discovered a printed diagram from Pham Hoang Tuan for a lovely ornate goldfish.
I remember being sent a bunch of printed diagrams with a paper pack from him (I won it for … something I cannot remember), and realise I have yet to fold most of that hand-made and hand-coloured paper … must do something about it.
I approached this model like most – I first grabbed my goto test-fold paper (Kraft), decided to try a 30cm square and set of, reasoning that I will either finish it or fail trying – both are useful journeys.
Like many diagrams from Pham Hoang Tuan, I found some inconsistencies between what was being asked and what you had to do that with, but as a reasonably experienced folder I was able to “creatively” step over those weirdnesses.
This model is lovely, and screams for pretty, textured, thin paper – so I must re-visit it with the same. Like Ronald Koh’s Goldfish, this model is volumetric (it is chubby), has a profusion of fins and the shaping requires a deft, delicate touch. I love the formation of the eyes and separation of the fins, a symphony of bizarre genetic engineering designed to create fan-tailed delicate ornamental goldfish.
It contains a number of seemingly impossible closed-sinks to shape the body and create volume, but the net result is quite beautiful – one I will return to.