Although (technically) a re-fold, the last time I attempted to fold this I had a partial crease pattern and a broken incomplete set of instructions in Russian, and just muddled along. I am not sure the resultant model even looked like Wall-E, but I was happy to sort of nut out a scheme for making his tracks.
I stumbled across a set of partial diagrams by “Tosummerny” in Chinese that seemed to surface more of the actual process, so decided I had to have another go.
I went big – 90cm square – seems excessive …but … I have another exhibition pending and thought this might make a good display piece if it ended up tidy enough.
The diagrams clarify the construction of the pleats necessary to form the main body, and how they cleanly articulate to make the beautifully treaded tracks, and also simplified what I had in my previous attempt mangled together to form the eyes.
This model has been on my “must fold” for ages, but I had only ever seen a CP and could never make head nor tail of the design. I saw a rendition on Origami Dan Discord and, after an enquiry it turns out there exists an unofficial diagram, drawn by Hua Ge that guides folders through this terrific insect:
I split a sheet from a new 60cm roll of medium weight Kraft and began folding. There is a load of pre-creasing, primarily setting up the high-density collapses to make the long thin legs, so accuracy early on pays dividends later.
Uncharacteristically, this model uses loos pleat structures to bulk out the body, define the wing covers and head/thorax/abdomen, with a deliciously complex un-sink to make the head-thorax join. Interestingly this model also has a super-detailed head/face – it reminds me so much of the hoppers in “A bugs life”, and it has real “cute” personality, as much as a locust can be cute.
Tucked away in an inconspicuous corner of the deserted clearing, nestled almost invisibly among the leaf litter, the first signs of civilization were found in the form of a rough-hewn but definitely hominid-worked paper offering. For whom, to what, why … we shall never know:
Followers of the blog will notice occasional references to paper making pursuits. This post looks at the most recent results of a paper making workshop I attended in early July 2023. I had previously (back in 2019) been a member of PAQ (Paper makers and Artists, Queensland) but found full time work made attending events difficult. Now I am retired I have more freedom, so reapplied for membership.
The group’s interests in paper are diverse – from botanical paper making, monoprinting, encaustics, stitching, collage, pulp sculpture and more – my interests are (fairly narrowly?) folding, but it is important to have ones interests informed by a wider palette so I am very much the learner in that group.
Previous workshops I made sheets with finely beaten banana stem and cotton display board, day lily and lemongrass pulp, and still have some of the paper from that session. This session we pulped banana stem (coarsely this time) and mixed it with lemon grass, Philodendron, and South African Pigeon Grass stem, in various combinations. The pulp was added to water, then a suspension-aid made from water soaked chopped okra, which generates a mucilage that makes the vat water more goopy, helping the pulp to stay in suspension longer before settling out. The results were much coarser paper, but it presented an interesting challenge to see what I could fold from it.
I first pressed then dried my sheets, brought home still dripping. I carefully separated them from their couching sheets (old torn up bed linen) and selected sheets to process further. Using a fairly stiff batch of Methyl Cellulose, I stuck sheets to my glass and let them dry, reasoning (correctly it turns out) that the MC would make the sheets more pliable and bind the fibres more closely together (given some of them were very loosely bound, this seemed like a good plan).
So a fairly well known fact in Origami circles is that there are Origami Museums, few compare in size to the Spanish one in Zaragoza. When Jo and I had decided to spend time in Barcelona, we discovered Zaragoza was doable day trip from Barcelona Sants regional train station, so a plan was hatched.
Barcelona Sants is a regional rail hub, different to the metro. We will from depart here in a few days for Province, but this station also provides access to many other places in Catalunya and beyond. After locating our platform ( via a very helpful man at the Information counter), we had our bags (and everything else) xrayed before arriving on the platform to find the train already boarding.
We boarded AVE-S112 High Speed train, allocated seats a lot like an airplane, and took off. The train sped underground until it cleared the central city and burst out into the light as farmland flew by. For a lot of the journey the train was topping 295 km/h as it hurtled stop to stop.
After a little over an hour, we arrived at Zaragoza train station, and de-trained, got some refreshments then headed over to the Bus Station, to catch a C1 circle line bus, and rode it the remaining half way around to the terminus. After a brief bit of nav we were picking through the back streets to EMOZ, located on the 2nd Floor of Centro de Historias, Plaza San Agustín 2.
I had been in contact with the museum ever since there seemed a chance for me to visit, and it was lovely to finally meet an online friend named Jesús Artigas. We nerded out a bit, talked about the current exhibition and about Yoshizawa’s works, and particularly the work of Eric Joisel.
The museum has, on display a number of Joisel’s original works, including one of his gnome orchestras, his large-scale Rhinoceros and his large scale Pegasus.
Jesús let us sneak peak in the store room at Joisel’s large Hippopotamus also, all master works from a genius artist much missed.
We talked folding, design, and it turns out he is working on an interesting origami publication of endangered Spanish animals, and asked if I was interested in test folding closer to publication date. What an honor indeed, naturally I said yes. That should be fabulous and something else to be involved in when I finally return home.
We parted company with the promise of future collaboration, then Jo and I took our time appreciating the many rooms of exhibits. It was good to see so many original works from legends in the field, including Victor Coeurjoly, Robert Lang, Junior Fritz Jaquett, Kashiwamura, Jozsef Zsebe, a host of different Vietnamese designers, and even a tiny work from Yoshizawa himself. We are not worthy.
The museum also offers informative information about the paper/folding traditions of many countries. It is interesting that many different schools of folding crafts emerged independently with the introduction of paper and paper-like materials. We also saw some very early traditional folds pioneering skills from historical giants that modern day origami designers stand on the shoulders of.
The feature artist at the moment is Vivian Berty, with a number of rooms devoted to her colourful, figurative and representational varied art practice. Such a riot of colour and range of simple to elegant models, compositions and modular works.
It felt like home for me, to be surrounded by an art form I have spent a lot of my life exploring. Nerd-feasts come in every flavour, and this was one of mine.
After leaving EMOZ, we reversed our journey to Zaragoza Delicias rail station, grabbed a late lunch and then our train back to Barcelona. I am sure I gushed, Jo was very tolerant of a very happy nerd. If I get the opportunity I would like to visit again, as well as explore the other origami museums of the world.
One of many habits I have developed, when travelling, is to “art bomb” the places we stay:
I take origami paper on holiday (like, who doesn’t, right?) and like to hide a finished cute model somewhere in our accommodation, restaurant, ferry, funicular or whatever for either the owner or a subsequent guest to discover – meant as a nice little surprise.
As an Australian, I try to include aussie flora or fauna, and memorize the fold.
If I am to be completely honest, I am astonished I have never folded Jo Nakashima’s “Kangaroo” before. It is a little charmer. I have a pack of indigo Tuttle paper that will be perfect for this, so it is sorted (apart from the practice needed to fold it from fading memory).
Avid noticers of this blog will realise that, since 2011, I have been rapidly expanding my abilities as a folder. Like most people, my first ever origami experience (apart from largely unsuccessful paper planes) was an origami crane (Tsuru) – taught to me as a boy of 11 yrs by a Japanese exchange student. A few years back I completed my task of learning how to fold Satoshi Kamiya’s “Ryujin 3.5”. This fold is not unrelated to both events:
Crane to complete Eastern Dragon is quite a journey, learning all sorts of new techniques and refining skills along the way and this fold celebrates that very journey. Originally designed and folded by Brandon Wong (@ThePlantPsychologist) – I first saw his fold on Instagram, and then photos of it on OrigamiDan (a discord server I am a member of) and vowed, one day, to fold it.
Brandon very kindly published the Crease Pattern along with photos of his fold, and right now I am rapidly learning to solve crease patterns so the perfect storm emerged after retiring I have time to tackle more ambitious folds.
After gridding the 90cm square, I set about laying in the exacting additional creases needed, including a puzzling pythagorean hinge line and some baffling level-shifters. Collapsing was a …. process. Apparently I “parachuted” the model – starting at the edges and working towards a bulging centre is termed parachuting (which is something I must address) until it more or less sat flat. After checking in with Brandon (isn’t the internet amazing) he suggested a fix for the only collapse kludge I had on his right shoulder.
Browsing my pile of Tanteidan magazines, as you do, I noticed a model labelled “wolf” that I thought was more typical of a collie dog:
A lovely complex fold that, although uniaxial, seems to hold itself together and self-stands without assistance. The management of the bi-colour features is also interesting, suggesting the feathers and white patches of a certain young and enthusiastic collie called “Scout”.
The head shape contains a lot of “judgement” folds that change the shape of the nose, jowels etc so I think I could, with some planning, get a better defined collie head, but I am pretty happy with my first fold.
Proofing manuscripts that are soon to become Origami books is an interesting (and sometimes intense) business. While looking at a recent draft, I happened upon Nguyễn Tiến Kha’s lovely new “Lapin (Rabbit)” design and new I needed to test-fold it:
This is an intense fold – it eats up so much paper (I folded this little lovely from a 45cm square), but in the end we get a lovely bi-colour rabbit with all its bits in the right place, good proportions (although a little “top heavy”) and (with a little bum surgery) self-standing.
There are lots of origami rabbits, I have folded most of them, and this one is a charmer for a bunch of reasons. The fold sequence is ingenious, intense and really reliant of accuracy early – lots of pre-creasing provides good landmarks later on, and some lovely emergent geometry as you turn things inside out, round and about.
Eric Joisel was rare in the Origami community – he was a sculptor first, paper folder second. To him, concept was king, technique secondary – saying that however, few breathed more life into paper than him. The “Birth” sculpture series is particularly interesting as the subject is META – arising from the flat sheet , a figure fights to be born – pure genius in his hands.
“Birth 1” was an abstract humanoid scrambling from the middle of a rectangular sheet, “Birth 1” was a prototype Gnome, and “Birth 3” was one of his signature Dwarves emerging from the edge of a rectangle. I have found no clues as to how Birth 1 or 2 were achieved, but, with some assistance (and a possible CP shared by @fishfolder I was able to have a stab at “Birth 3”.
The journey for this particular fold started in 2019 – our last International travel prior to the pandemic. We travelled to Hanoi in Vietnam. One of the pilgrimages on that trip was to a small outlet store for a village collective who were revitalising the art or making traditional Dó paper by hand. I bought a sheaf of sheets, all natural dyes from Zó Project and carefully shepherded them home in a postal tube safely tucked into our suitcase. I now had a perfect sheet for this model: Natural Dó with leaf inclusions, an almost fabric-like sheet 60x40cm. I needed the shave the deckle edge off one long side to give me a “square” reference, as the sheet was deliciously wonky – this left me with a sheet close to 1.8×1 in proportions.
Next, the protracted and painful process of laying in the creases to allow the base collapse. The first cut and the first fold are the hardest, as there is no room for error. I was determined not to lay in any unnecessary folds, to allow the otherwise untampered paper to shine. I used the 28 grid version of Joisel’s Gnome, because I like the proportion of arm:body:legs you get at this grid, but accurately laying in 28th-based creases was an exercise in measured mister really.
As I approached the date of my retirement, I genuinely struggled with how I could sum up my work-life, and how was going to say thankyou, personally, to so many people I have loved working with.
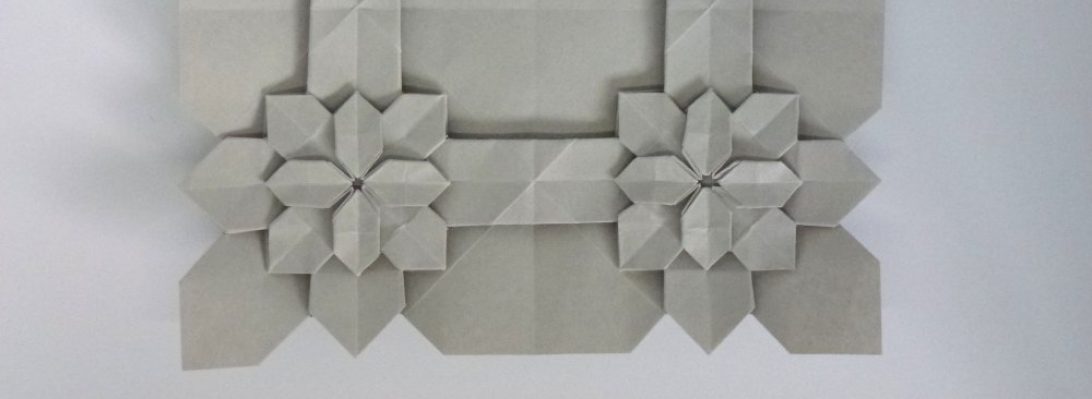
It occurred to me that Origami could be my savior, and something hand-made and precious was the order of the day, so set about making Naomiki Sato’s pentagonal “Hybrid Tea” roses – in my opinion the zenith of his glorious rose designs. From a pentagon, with some skill, you sculpt a spiraling bloom of some 25 petals – genius as it is folds only – no cuts, no glue. Originally I was going to present them stemmed, but re-worked the idea to have them sit on calyxes instead.
I gave myself 3 weeks, and it turned out that was not really enough time, as each bloom from go to woe takes just over an hour – even when batch folding. It was a labour of love, and I got it done, and resulted in an amazing coincidence. I listed the recipients, and it totaled 33 – this number corresponded to the number of years I have been working at this current school – it was clearly meant to be.
Acquiring paper, cutting perfect pentagons, calculating the relative size different between flower and calyx was the first task. I found if I cut the largest pentagon I could from an A3 sheet for the bloom, then the corresponding largest pentagon from an A4 sheet was perfect for the calyx.
Production-line techniques then ensued – precise pre-creases, pre-collapse wrangling and locating landmarks for secondary petal separation all have to be done first, and at this scale it is fiddly folding, and you need about 7 fingers on all of 3 of your hands. Once the dissected spiral collapse is complete the really hard part starts – shaping the petals to be soft curls in staggered cascades – quite a knack.
I was doodling with a scrap of 2×1 note paper and arrived at what I think might be an original model:
This little snail has a volumetric shell and body, along with some lovely poseable eye stalks.
Originality in Origami is tricksey, as most models recycle techniques from other folds, and the head/eye end uses a fairly standard waterbomb-accordion sink, but I cannot remember seeing it used in this way.
The shell is formed initially by outside reverse-folding the body and as such offers a colour change opportunity if folded with bi-colour paper.
I made a video tutorial if you want to fold it, or read further for a set of photo diagrams.
This is a very personal fold, as well as a lovely meta design:
The first thing most people learn when they start out in Origami is the traditional crane. This fold speculates the genesis of this model as a happenstance some time back in the mists of time. Interestingly, the first model I was taught, as an 11 year old, by a Japanese exchange student, was the crane.
Designed by Boice Wong, released as a crease pattern, I was decided to give it a whirl. If I am honest, I am not really happy with my first fold, and will probably attempt it again (having learned heaps in the folding). The CP can be found here: https://www.obb.design/cp#iocrane
Using a single square, no cuts, we have a lady in a traditional kimono, kneeling in front of a low table on which there is a single crane. The genius of this design is the model is complete – it looks finished all the way around (indeed I fashioned a lovely “bow” Obe at her back. There is a colour change making the table/crane a different colour to the girl (I decided the focus of this fold was the crane, so it ended up white – next time I might just paint it, or perform an additional colour change which is possible with this design but results in a clumsier crane I think).
This has taken me an age. Initially, I attempted to collapse the base only to discover it was inside-out, then trying to sort out what flaps did what job (kinda aided by sorta advice from Boice himself), and decided on the current flap assignment when trying to ascertain how to compose the kimono and hide the internal layers, yet still give me the hair fringe. Quite a wrestle in the end.
Anyone who owns a lawn realises it is a constant battle to keep it mowed, tidy, healthy and weed free. In a tropical climate like ours, doubly so:
So we have a dandelion problem – hundreds of the little buggers pop their flowers up after I mow and I am loathed to resort to spraying them, chemical solutions are my last resort. I googled the problem and found a no-bend weeding prong that seems custom built to pluck the little suckers root and all.
We ordered 2 (a his and hers set) on the off chance we both would want to do this, the arrived in pieces and after a simple set of instructions they were assembled, ready to go. In our first session on the lawn we easily filled a large bucket with extracted dandelions and realised this was a solution, albeit manual and long term.
In the latest Tanteidan magazine, by pure synchronicity, there were diagrams for a modular dandelion designed by Toshikazu Kawasaki. I set about folding the pieces and, after a fairly simple set of instructions, the dandelion was assembled and ready to go.
Looking for a model to welcome in the new year, and also to further my Crease Pattern solving ability, I hoped this model would serve both purposes:
Part of a book I have helped edit prior to publishing, this is 1ctzH8jm0N2’s “Bone Dragon”, a CP and photodiagram sequence from the forthcoming book “Ori-Fancy 6”.
I started with a 90cm square, I divided into a 32 grid, then located the required diagonals, then begin allocating mountain and valley orientation to the creases before attempting the collapse.
There are lots of details here, and the initial collapse generates most of them – I buggered up the head collapse (rather I found the intricate point in point structure that would eventually become the horns too hard to do initially) but found it easy to do post-collapse, and was initially flummoxed by the feet structure until I realised a series of sinks needed to be closed-sinked, and another set needed to be open-sinks (hopefully this will be made clear in the final photo diagram annotations).
The body ends up being 30+ layers, making the necessary crimping for shaping really difficult with thick paper (I used natural Kraft paper) – there is a nice “bulk” to the body, and the body feels solid – thinner paper would make shaping less torturous.
I am trying to get my brain back – the term has been brutal so I decided some paper therapy was in order. I originally folded this model back in 2011, on tiny paper, and the resultant mess was posted as part of that year’s 365 challenge.
I had vowed to re-fold it with better paper, and I decided to do that today.
I cut a 50cm of pearl coloured Lithography paper, and carefully followed an instruction set that only lasted 103 steps or so (quite quick for a Kamiya model).
I love how this horse seems to emerge from an otherwise non-descript tangle, with glorious and sensibly placed, appropriately muscled wings.