1100: Steven Casey’s “Clownfish”

I have the privilege of being asked, from time to time, to test fold origamists new models. Steven Casey (designer of the BEST origami echidna there is) asked me to test his new design for a clownfish, naturally I jumped at the chance:

I took a 6″ square of regular origami paper (orange on one side, white on the other) and, armed with disbelief that this was the suggested paper size, began folding.

My fold approach over the years has changed markedly – I fold until either (1) I get to the end or (2) it fails, and I learn something. I FULLY expected this to go wrong – my fat clumsy fingers do not normally fold those small squares of origami paper people keep giving me (with every good intention), and for LOTS of this model I resorted to my favourite set of bent-nose tweezers just to keep it sharp (and not mush with said fat clumsy fingers).

It became pretty apparent early on that the fold sequence was entirely achievable with 6″ (15cm) squares, resulting in a charming little totally recognizable nemo. I made a few cosmetic suggestions to the diagram set (sometimes the designer lets me edit their diagram directly) and repeated the fold on 17cm square – I liked the smaller one better but it was prolly because I rushed the second fold while paying attention to the telly instead. I would like the head/gills to lock on to the body a little more and the fins also to stay together, but these are minor unimportant quibbles.

I am hoping Steven is planning a book of his new designs, this one is lovely and reminds us all that “you just gotta keep swimming”.

1099: Songbird

To mark the release of Phạm Hoàng Tuấn’s new book, he released a photo sequence of a little songbird on Fakebook:

Hundreds of development photos lead you (sort of) through the exacting process of folding this little wren-like bird. I decided to throw some nice paper at it.

The suggested size the author used was 20cm, so I went 35cm square, thinking I would have been safe, but should have looked ahead as it got waaaay too thick due to layers really quickly. Not to be deterred, I thought I would try to shepherd the now clearly wrong paper through a torturous fold,

In the end, some features (like the head) were really clumsily folded due to thickness, but I am pretty happy with the number of bird-like features I was able to tease out of this lovely sheet. I was also reminded of an important lesson – choice of appropriate paper is REALLY important on complex-supercomplex models.

I posed and stabilised it as much as possible, and will prolly fold it again some other time. The photo sequence was super annoying to use – it kept timing out (google drives get lazy) and so many of the photos showed indeterminate actions at times I was left scratching my head thinking “what is actually being shown here”. Beggars cannot be choosers however, so I gave it a red hot crack.

Continue reading

1095: A Wing and a Prayer

Having just treated my first 2 bits of Wenzhou paper, I was itching to fold something (and running out of time to do so). I decided on a Praying Mantis, designed by Jo Nakashima model that I have not yet folded:

Jo Nakashima's Praying Mantis

Based on a 40 grid, using fairly standard box-pleating tricks, this model is a lot of fun to fold. Jo helpfully provides diagrams that detail how to efficiently and accurately lay in the crease pattern (check it out here) and in doing so I learned a LOT about treated wenzhou: It is deliciously thin, crisp and really strong (it allowed me to bugger up a collapse 2 times before getting it right, without paper fatigue). One thing I did not expect was it’s relatively poor reversibility – ie. you fold in one direction and then turn it accurately inside out. I was expecting it to be easier to reverse.
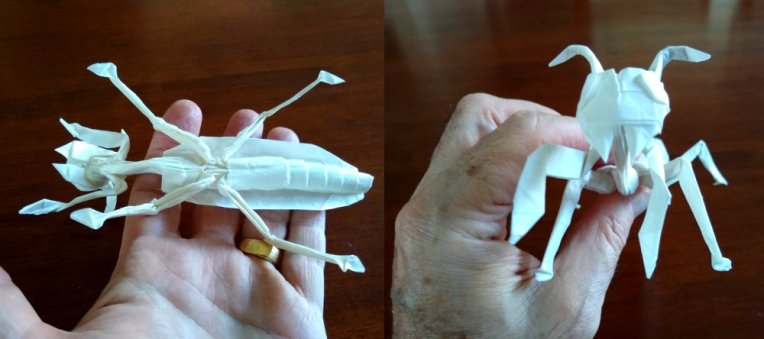
Jo Nakashima's Praying Mantis Views

Instead of “parachuting” (apparently a CP solve no no), I used the central axis and formed the head, thorax and as a consequence formed the front 2 pairs of legs. The abdomen collapse is fascinating and bends back under the wings making it really tidy all round.

Continue reading
1092: Riccardo Foschi’s “Frog/Toad”

Few origami designers design, present and then release CPs, diagrams and tutorials for their work like Riccardo Foschi:

When I saw his newly designed frog 2 days ago, I was hoping for there to be a tutorial or CO soon, his tutorial dropped yesterday and I knew I had to fold it.

I used a square of Duo Thai paper – dark and lime green and folded it slowly to enjoy the demonstrated process.

The front end of this frog/toad is wonderful – big whimsical eyes, beautiful suckered feet, nice shaped head. My only criticism is that the back legs and bum are a little stubby – there is quite a bit of paper back there that is not doing a lot, but as is it is simplistic. None the less, I love this little chap.

Continue reading

1089: Caiman

A caiman is an alligatorid belonging to the subfamily Caimaninae, one of two primary lineages within the Alligatoridae family, the other being alligators:

Caiman

When is a Crocodile not a crocodile – when it is an alligator, apparently.

This model has taken me an age for a number of reasons. The model, a genius design from Jeong Jae II (taken from the book “Origami Pro 6 – Wild Amazonia”) has over 300 diagrammed steps (worse, many are “repeat x-y, in reverse upside down”) and every part of the square is worked, then re-worked in many and exacting ways. I wanted to understand and enjoy the processes I was performing and some of them took time to do precisely.

Not rushing to “set” a crease is an important tenet here – until the crease is set there is still time to change it, once set it is permanent damage to the sheet – I tried really hard to set the creases in the correct place.

Caiman views

Scaled/pleated models always fascinate me – the design strategy behind HOW these are designed are completely beyond my comprehension – pleats and scales take a LOT of paper, so planning what is done and where is exacting. Following the set of instructions is complex enough but there are some who could fold this monster from a crease pattern (CP) alone – but not by me – that still is beyond my ability.

A quality design looks good with folds alone – and when I had laid in all the creases and roughly shaped it, the model was already wonderful. I did a little bit of cleanup – closing gaping seams with spots of glue, closing the underside of the tail to give it volume and wires in the legs for permanent posing. Remarkably little was needed to make this presentable.

Continue reading