
Flipping through the book “Origami Masters – Bugs – How the Bug Wars Changed the Art Of Origami”, you cannot help but be frightened by this model:
Robert Lang, mathematician, engineer and origami design genius in this model pushes the envelope of what is possible with paper on a number of levels. The book gives general hints about a truly terrifying paper manipulation which I think, largely ignores the fact that paper will be used in the fabrication.
So many layers, such density of fold, unfold, rework, re-fold, then repeat a different way makes each step in this diagram sequence an amazing ride. Just the pre-creasing alone took me the best part of a week and a half – in retrospect I wish I had folded the whole 56ths grid first, but instead, I only laid in the creases he indicated we needed (making the whole creasing process much more time consuming).
Terrifying steps like collapse this all at once (step 28, that took me 2 days to understand how it worked) or “Step 30: refine the collapse” that took me a whole day just to work out how that maneuver was even possible.
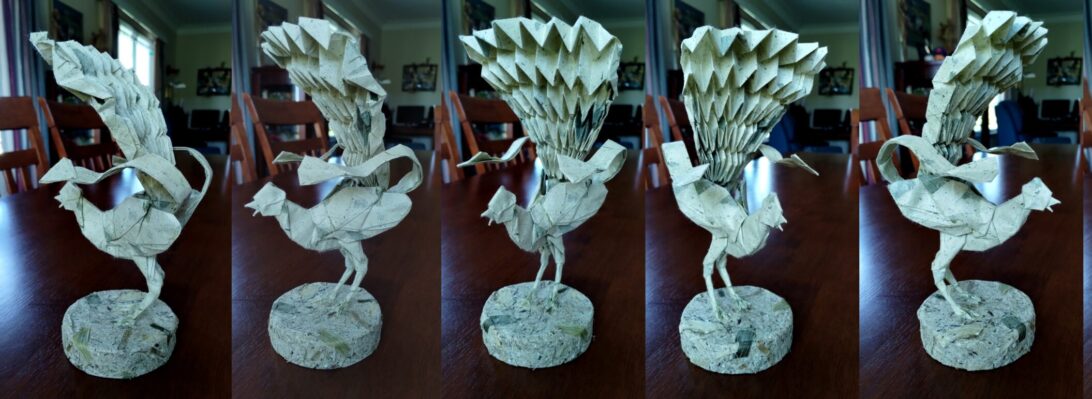
For budding entomologists, this model is a joy – fully articulated legs, beautifully segmented abdomen, thorax with lovely set of wings, head, antennae and proportions that are immediately pleasing. It is clear this is modeled off a real American or German Yellow Jacket wasp – a close relative to our Hornet. these nasties are colonial, hunt in packs, feed as adults of sugar rich things but they feed their larvae meat – anything they can chomp up for them.
This model has taken me ages for all sorts of reasons. Coaxing the 60cm VOG paper to follow quite rough processes was trickey – there is a little paper fatigue resulting in a tear in a gusset that is not visible, and many parts of the paper were bent and re-bent past the usual tolerances, resulting in flimsy parts that needed re-sizing with MC to stop them disintegrating.
My first fold of this model is not perfect, I can see parts that if I was to fold it again I would re-work totally. Paper management is really important – getting the right number of appendages among the various parts reserved for body morphology make some of the moves seem impossible until you try them. Many a time I dropped it, got up and left, resolving to throw it out only to return when calm and refreshed and take it that step further.
Paper choice is important here – you need an impossibly thin, very strong paper in a pretty big size. I made mine from a 60cm square and would have struggled to fold it much smaller, but have seen it so – lots of to them. Even the demonstration model folded by Dr Lang has laser etched pre-creases visible, marring the otherwise crispness of the fold I think. I am not sure the instructions are complete (or correct in places – the leg assembly seems slightly off to me) and some of the details are a mystery (the development of a stinger just happens somehow, but did not for me).
I am very happy to have added this model to my experience base, and would not have even attempted it a year ago, which is encouraging.
I am, however, in awe of the design – wow, just wow!
Hi
I read in a previous post that you use Educational Colours ‘Mix a Paste” as MC to size the paper – was this model sized with Mix a Paste?
How well does it work generally? I have some too and was wondering if I could use the same.
Thanks,
I used MC for this and most recent models (having run out of “mix a paste” 2 or so years back). MC is better but mix a paste works ok also, not sure it is PH neutral like MC is all which might effect long term storage of paper things
Hi Peter – may I ask what paper did you use?
Hey Winnie – I used a 65cm square of yellow crumpled VOG (Vietnamese Origami Group Paper, from OrigamiShop.com) – a little thick for the job to be honest but in the end the final beastie is lovely
What paper did you use?
again, a sheet of crumpled VOG paper
I really want to know how to make it and I can not get the book and it does not show on the computer
I will not break copyright laws, sorry. Buy the book, this super complex model is astonishing, worth the price of the book alone.
https://www.amazon.com/Origami-Masters-Bugs-Wars-Changed/dp/1937994104
Great work. I’ve just got the book from origami shop. Really wanted to make this model ever since seeing a picture of it. I’m not sure I’m good enough yet, and am still working through a Shuki Kato book but will have a go soon. Nice to see some of the intermediate stages of the fold and thanks for the information on the paper. Having read your blog on this has strengthened my resolve – although step 28 does still look more than a little daunting 🙂
This model is not for the faint-hearted indeed. Interestingly I thought I would give it a go – keep folding until I failed to understand/achieve a step. I too am amazed that never really happened as there are some terrifying moves here. I doubt I would have achieved it at all without doing lots of other Lang’s models – he has a repertoire of moves that take some mastering.
I wish you luck with your fold, let me know how you go. I have yet ot purchase Shuki Kato’s book – it is on my wishlist
Thanks for the words of encouragement. I will persevere. I can heartily recommend Origami Nature Study in terms of the folding process and the quality of the models. Indeed, I am just having another go at the complex dragonfly and am amazed at how he has diagrammed to create a form extremely similar to the collapsed Yellow Jacket, but in a step-by-step way. Some great origami on your blog – it’s nice to see what can be achieved. All the best.
Got through the test fold. 🙂 I think the worst part (other than the pre-creasing) is getting the tip of the abdomen to collapse in step 28, but not as fiendish as I thought it would be. Although the wrong colour, glassine works nicely. Thanks again for the blog as it did encourage me to give it a go and I’m glad I did. Cheers. Col
Go you good thing! I have not used glassine – it is like a plastic? I would have thought it would fatigue on much reversed meridians but good work, step 28 is a real bastard indeed, but then there is much to challenge and reward in this model.
Hi, Glassine is good in that it comes in a metre wide roll and is fairly cheap, It is very strong and thin and, because it is quite like plastic, it holds a crease very well. The only problems are it is quite transparent so some models look odd as you can see through to shapes from inner layers, it is also difficult to form a reverse fold – it will tend to create a new crease in preference to reversing an existing one, but once aware of this and with care you can get it to reverse ok. Reversed creases did also seem strong enough – I had no problems with fatigued creases. I don’t know if it will show, but here’s a link to a photo of it in a public Origami group on Facebook: https://www.facebook.com/photo.php?fbid=10157132078100750&set=gm.1985118975130022&type=3&eid=ARAcp_-Jx03V-igJ_SS0VCVFiqip7TlQo5KaCise7F3g-8nOiGik9toYVSbbFkVnis8Kvf4w0sWzTQJf&ifg=1
All the best – I’m off to find a new project now 🙂