Working on an Australian Wildlife series, naturally I had to include Satoshi Kamiya’s lovely Green Tree Frog:
I had a day-glow lime green sheet of Hanji in my stash, gifted to me from a collegue who brought it back from Seoul a few years back. I decided I wanted to treat it and colour it with some of my acrylic inks.
I misted the sheet with water, wet a large glass window, rolled the damp hanji onto the wet glass and then coated it with a thick coating of methyl cellulose (MC).
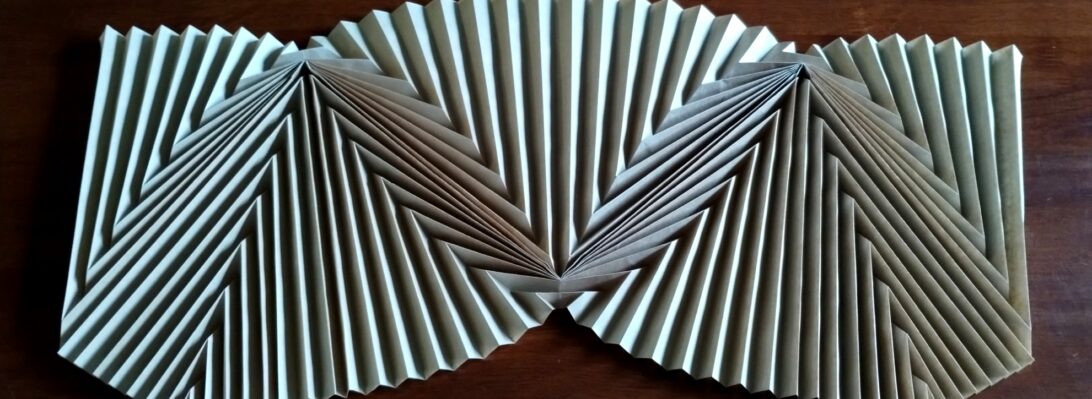
One of the few applications of the Miura-Ori (map fold) that I can tolerate folding is to make the fantail of Satoshi Kamiya’s Lyrebird.
I had a half-sheet of leaflitter paper in my stash (bought some 8 years ago) and thought it fitting to fold a bird that lives in the leaflitter out of it.
This is not my first fold of this beautiful model, but it is my best. Having good, thin, tough paper helps as accuracy is everything when folding the base – so many opportunities for crease misalignment exist and, as the paper thickness ramps up, there is bulk there.
Interestingly, the “bulk” ends up being in the body area which then naturally “fattens up” the bird in a really naturalistic way.
The life of a male praying mantis is not all beer and skittles – inattentive and less nimble males often become a post coital snack for their partners in a brutal twist on “the circle of life”:
This is a pair of Satoshi Kamiya’s Praying Mantis, and this may well be my longest fold (in total elapsed time) to date. Two and a half years ago (the year before I had retired), I sat down with a crispy 55cm square of Kraft paper and began folding the maquette for this model (the brown one). I was stressed, it ate up an afternoon and calmed my racing brain but I got tired, lost my place and then mental fog set in and I could not for the life of me work out how to do the next step (making the little barbs on the inside of the front legs).
Determined to return to it the next day, I tucked the model into the open book I had in my book stand, put it away and … ignored it for 2.5 years. I am not sure my book “Works of Satoshi Kamiya 3” appreciated being splayed open for all that time and is now, finally, resting closed with the rest of my Origami library.
I finally had the “perfect” mantis paper – pre-coated green Unryushi tissue from Kami paper store, purchased a month or so ago when we were in Melbourne. I cut a perfect 50cm square from this deliciously thin and crisp paper and began folding. I was fired up to return to the partially finished but stalled fold and give it another go – how hard could that be?
I folded the green up to where I had stopped with the brown, then realised the next step was actually pretty simple (just not clearly diagrammed – representing such complex 3d manipulation in a series of line drawings is really hard, I know), so was able to take both the maquette and green production fold all the way to the end of an astonishing 271 step sequence.
The design is genius, and relatively efficient – interestingly there are triangle sections of paper folded away into the middle legs that is the only “waste”. Via a torturous process of isolating, crenellating and thinning the entire morphology of a lethal stick insect emerges from the tangle.
As an apex predator, the praying mantis is the perfect killing machine. Large swiveling eyes, sensitive antennae on a fully articulated head, complete with chomping mouth parts. Perfectly proportioned and armored thorax sporting 2 sets of thin legs and a pair of lethal clamp-like razor fists. Wings and a lovely plump pleated abdomen finish the features of this astonishingly complete insect – all from an UNCUT square of paper – just wow.
As lightning crackled from the raging thunderstorm above, the electrodes sizzled, the smell of burning flesh hung damply in the air as the creature stirred on the table, accompanied by a mad cackling laugh interspersed with hysterical cries of “It’s Alive!!!”:
Apologies to Frankenstein lovers, but let us face it, this model is a bit of a Frankenstein. It is the result of putting a Satoshi Kamiya RyuJin 2.1 dragon head on a classic Tsuru (Crane)’s body. Nuts – right?
I first saw the CP (Crease pattern) for this on one of the Origami Discord servers I frequent (RyuCentral), and thought … how odd, how hard could that be??? Stupid man!
Dividing the paper into quarters and half along one diagonal, I reserved 1/4 on the diagonal for the crane and then set about laying in the graft CP for the dragon head in the remaining 3/4. It needed a 23 division grid that intersected at the square opposite the crane. Accuracy was the key. Grid laid in, I then started setting the pre-creases necessary for the head – stupid man, fucked the first set up twice (because I did not count), finally, pre-creasing done the collapse began.
I have folded many Ryu Jins, many versions, many times, so it was like returning to an old friend, interestingly muscle memory helped me not find the horrendously complex manipulations difficult at all (or maybe my subconscious was blocking the trauma) but to my surprise the accuracy I obsessed over early on paid off later allowing a pretty tidy collapse and NO damage to the reserved 1/4.
With the head collapses through early base, late base and shaping, I isolated and shaped the little arms and then set about working out how to fold a crane with the head as the head. Annoyingly I chose the wrong orientation first (der) and the head was upside down and backward. Just when I thought I would have to perform an infamous “neck twist” (interestingly NECESSARY on full RyuJins), I tried unfolding the crane and reversing all the creases (ie. folding it inside out) – to my delight that solved the problem (and THEN I remembered CPs are usually drawn WHITE SIDE UP – what a dickhead!!!).
Looking for something to de-stress and unwind to after a brutal term, I turned to “The Works of Satoshi Kamiya II”, and a model that I was astonished to find I had never tried – his hermit crab:
Starting with a 70cm square of natural/white Kraft paper, the fold was challenging as you allocate one side of the sheet to the crab, the other to the shell. Via a fabulous fold sequence, you tease legs, claws, antennae, eyes and mouthparts while delicately colour-changing the rear and then spiralling a shell as his home.
This is, (der), genius design – I always am amazed with Kamiya designs, and the elegance of the developmental sequence – as if the journey is every bit as delightful as the destination.
I am trying to get my brain back – the term has been brutal so I decided some paper therapy was in order. I originally folded this model back in 2011, on tiny paper, and the resultant mess was posted as part of that year’s 365 challenge.
I had vowed to re-fold it with better paper, and I decided to do that today.
I cut a 50cm of pearl coloured Lithography paper, and carefully followed an instruction set that only lasted 103 steps or so (quite quick for a Kamiya model).
I love how this horse seems to emerge from an otherwise non-descript tangle, with glorious and sensibly placed, appropriately muscled wings.
There were 4 hours allocated for the teaching of “Dog”, we finished in about 3 so Satoshi decided to teach a simpler model that he said was the most “realistic cat” he knew – modelled after his own pet apparently:
A simple fold sequence, we have the back of a cat staring intensely away from us, just wonderful. I have seen other session attendee’s models where they added details to the front of the cat (when I re-fold this I may too).
Again, the sequence was fluid, and a joy to follow along with, interjected with banter and casual observations by the master – such a privilege to have been able to fold along.
The star drawcard (for me) was an opportunity to fold along live with Satoshi Kamiya – he taught 2 models and I managed to follow along with the broken English, translator and zoom limitations:
The sequence of most of Kamiya’s models are delicious – so natural, logical and a totally different/unique style.
This is a generic dog, different to the one most recently published and I can see how you could vary the base to get really nicely shaped dogs of many types – this one is a little “husky” like.
I really felt lucky to have been present, I am a bit of a fanboi, but it was intense and wonderful. Matching the master, fold for fold was a rare pribilege. I must re-fold this (as I am not really happy with the head I folded).
Further exploring all things equinine, I realised I had never folded Satoshi Kamiya’s horse:
Central to this horse design is a lovely mane, but the volume and proportions of this model are amazing, the base it originates from is immediately “horsey”.
Shaping matters, and I think I have been a little clumsy, but I suspect some of the fat is the paper – crisp 70cm kraft – I think if I had used a thinner/more textured paper the result would look less like a plastic horse.
There are lots of really challenging moves in this sequence – gathering the pleats to allow you to fan out the mane while not distorting the outside layers in mindboggling – there is LOTS of paper hidden, and I think my accuracy for this, the first fold, was pretty good.
I must chase up a copy of Issei Yoshino’s book – that horse has a mane that apparently inspired Satoshi to design this one.
This started as pure procrastination – I had marking and reporting to do but ….
Folded from a “live guide” photodiagram series produced by Daniel Brown, as part of a channel in a discord from another planet, irresistible as it is yet another variation of eastern dragon I knew I HAD to fold,
This little fellow is nearly naked – apart from some glue to hold in a wire spine and wires for arms and legs, he is otherwise folded only (hence some of the wayward seams and flaps). I quite like this unfinished appearance and think he will stay as is.
Folded from 90cm natural Kraft, it starts with a therapeutic 64 grid on the diagonal and goes to hell in a handbasket from then on. The basic folding is quite straight forward (as a Ryu master), this variation is a bit of a mashup between a 1.2 and the head of a 2.1 – the result is wonderfully complex and beautifully “Kamiya” in intent.
I decided to fold it in plain (both sides same) paper as the bi-color fold has a large gash of reverse side colour along the underside – I have used this to effect in both a 1.2 and a 2.1, so thought I would go differently this time. Interestingly (to me) this little chappie is folded with a sheet exactly 1/4 the size (and from the same paper roll) as my original 3.5 (a little Ryu Jin nerdistry there).
World Origami Days is a period end October-beginning November that is an international celebration of Origami. I decided to try a super complex model (fold until it fails) and successfully folded Satoshi Kamiya’s “Divine Dragon (Bahamut)” on the first attempt:
Rarely does a first fold work out but I kept folding and it did, much to my surprise and delight. The fold sequence is particularly punishing and describes a bit of an enigma of a model – the balance between paper thinness and size. I chose 80gsm 100cm square Kraft paper and at this size/thickness it was tough going in places indeed. The body and legs are incredibly thick compared to the single layer wings – a bit of a puzzle if you wanted to fold it small.
A “Bahamut” is a monster from the “Final Fantasy” franchise, and is an odd mix of a lizard, dragon, Godzilla…thing.
The detail here is terrifying. Thick, muscular 4-toed feet, thick dragonny tail, chest sporting a 6 pack (make that a whole slab), arms with 4 claws, complex and snarly horned head and glorious wings with an extra set of hands atop them – quite a formidable beastie.
This fold took me the best part of the weekend to complete, and I used a little glue (shhhh!) to tidy gaping seams and a little MC to stabilise his (? only they would know the gender) posture and basic body morphology.
If I were to fold this again I would use thinner prettier paper, but there are sections where front and back are visible, so the model is not really suited to duo paper – perhaps double tissue or unryu. I had forgotten how satisfying Satoshi Kamiya models are to fold, and how wonderful it is to just get lost in the folding process (I took no progress pics, soz) – it was terrific paper-based therapy. There are so many complex techniques here to isolate and separate body elements, genius design indeed.
Some folds are quite the journey, Ryu Jins are no exception. I have already folded the 1.2 and the 3.5, but had not tried the 2.1, relegating it to the “when I have time” pile:
Holiday time is a time of recharge, paper folding therapy is my thing so I embarked on the super-duper-complex journey with HUGE bits of paper. I decided to fold it in 2 halves (two 140 x 70 cm rectangles of red duo Ikea Kraft paper).
As a bit of paper engineering, Ryu are masterpieces of fitting so much on a single square. The 2.1 is laid out in a similar morphology to the 3.5, with 2 halves of the model on opposite edges of the paper. The Ryu 1.2, in contrast, uses the diagonal and is symmetrical about that.
I have begun the (some say perilous) journey to realise Satoshi Kamiya’s Ryu Jin 2.1. I have previously achieved the head of this model, and there is more work to do to become familiar with the other components, but this is a nice next step:
The tail of the 2.1 is different to the 1.2 and the 3.5 in that it is more of a fan blade, to get there, you need to fold a small section of the scale field, and pack away a bunch of the paper inside the body.
I have been on a mission for months now to try and render a tiger as realistically as I can in paper. Apart from being feline in shape, tigers have stripes – finding a model that has these stripes was difficult:
I bought Satoshi Kamiya’s latest book because of the tiger diagrams it contained – on flicking through the 200+ steps I initially thought it too difficult to try. But try I did, initially with large format red-natural Ikea Kraft paper. I was surprised that I was able to make it through the most torturous steps, so set about re-folding it with black/natural, ensuring the black was the stripes, natural was the residual body colour.
The genius of this design is the subtle and precise control of both sides of the sheet – the stripes are the result of folds, not cuts. The model requires you manipulate raw edges (the sheet border) fan-folded, while wrestling all the other details (legs, head, tail) from the INSIDE of the sheet – quite amazing.
…so I was approached by a friend who wanted to spring a surprise on his partner for her birthday. He said she liked dragons, immediately my shagged and fragged mind (marking makes me a disagreeable troll) jumped and I committed a huge bit of metallicised paper to fold Shuki Kato’s “Western Dragon” … because I had achieved it once in the 5 times I had attempted it. That failed.
Not deterred, I chose a lovely sheet of block printed blue mulberry paper (printed 2 tone with gold and white lotus flowers), cut the biggest square I could and set about folding Satoshi Kamiya’s “Ancient Dragon” (having achieved it once (in 7 attempts) – what could go wrong?
As it turns out, all went to plan – even thought he paper was smaller than recommended, I was able to tease, gradually, all the design features and “Tazzie” was born.